Review
-
Game Rating
Introduction to Descent: Journeys in the Dark
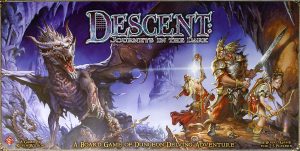 Published in 2005 by the renowned Fantasy Flight Games, the publisher responsible for dozens of widely popular tabletop series such as Game of Thrones, Starcraft: The Board Game, and Lord of the Rings, Descent: Journeys in the Dark was well received by the tabletop community. Descent is set in the fantasy universe of “Terrinoth,” which also is the home realm of the Runebound, Runewars, and Rune Age games.
It is a complex, one-versus-all dungeon crawler in which a party of players controlling unique heroes is pitted against another player, who controls “the Overlord.” The heroes’ goal is to stop the Overlord’s terrible plot, fighting monsters, looting dungeons, and facing magical dangers all along the way. There is also a timed element to the game; the Overlord’s deck represents the machinations of their evil plans, and running out the deck will mean a loss for the heroes and a victory for the Overlord. Because of this, interested players should expect an intense, competitive, and challenging experience when picking up this game.
Descent draws on many traditional role-playing game basics: heroes have unique abilities and can loot treasure that actively changes the way they play (not to mention their individual power.) Heroes gain experience from battle with monsters and grow in power by levelling up, allowing them to gain new abilities as play goes on.
The game is built around special scenarios called “quests”, which determine a unique map construction for each play-through, and the original game box contains sixteen quests. This means interested players will have at the very least sixteen completely unique play-throughs in the base box.
While this guide will focus primarily on the base edition of the game, interested players should know that Fantasy Flight Games has since published over a dozen miniature expansions, and five full-size expansions. Players who enjoy Descent will find a rich library of future play options.
Number of Players and Playtime
Descent is designed to be played with two to five players. One player will control the Overlord, and the rest will take the roles of heroes set against the Overlord’s evil plots.
Playtime is considerably longer than most games of this type, with the average game lasting somewhere between four and five hours. Playtime can be extended or stretched across sessions by linking quests together to form “campaigns,” which allow players to continue to advance their heroes across multiple miniature stories.
Note: Some modifications must be made in order to play with only two players. This will be listed in the “Variants” segment.
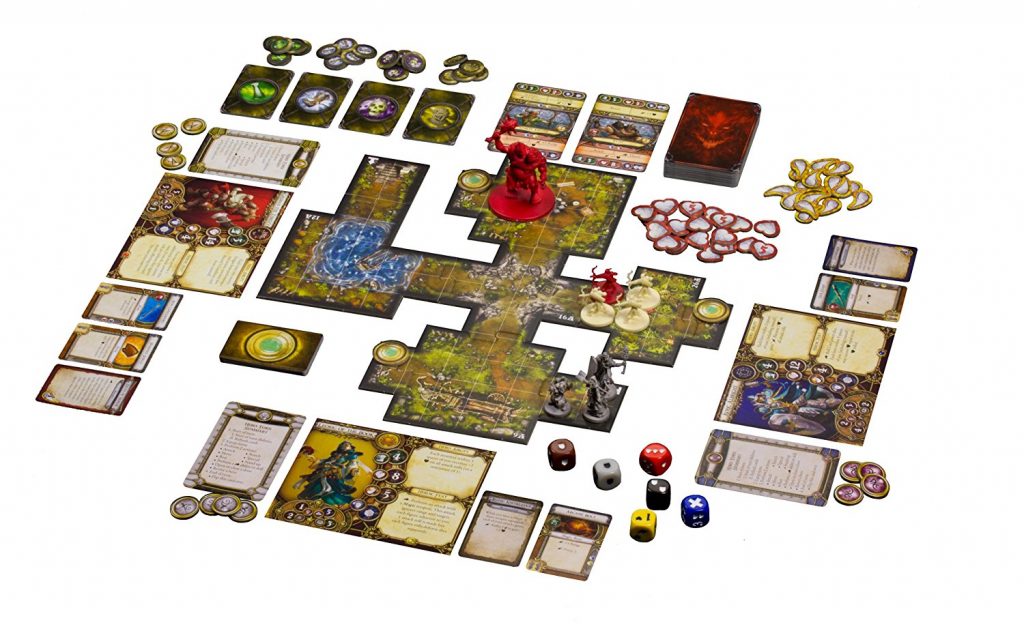
Components of Play
There are a great number of components with unique functions that warrant explanation. This segment will explore these in detail below:
1. Quest Guides
a. These are the booklets that describe all the unique features of an individual quest. These booklets should be kept on hand at all times, as they will serve as a reference for the generation of maps, conditions for loss and victory, and special modifiers for each quest.
2. Figurines
a. In the base box, there are three types of figurines, separated by colour. Grey figurines represent the heroes. Tan figurines represent “minion monsters,” the most basic monsters in the Overlord’s arsenal. Red figurines represent “master monsters,” dangerous threats the Overlord can bring into play.
3. Dice
a. There are a number of unique dice contained in the Descent base box. Blue attack dice, red and yellow power dice, and brown, grey, and silver defence dice help determine the outcome of combat. Their individual functions will be described later in the combat subsegment.
4. Cards
a. Class Cards are separated into eight sub-decks which each are assigned to a unique hero class. These cards represent the starting equipment, starting skills, and future possible skills for the hero players’ characters.
b. Shop Item Cards represent loot available for hero players to find or purchase within the game. These have two categories: Act I and Act II item cards, which will be unlocked at different points during the game.
c. Condition Cards describe the negative effects that can affect a player character. Each card describes its effect in detail.
d. Search Cards are special items that hero players can discover during a quest. These items cannot be found in shops and are therefore separate from the Shop Item Cards.
e. Relic Cards represent incredibly powerful, unique items which can be used by either the hero players or the Overlord. These items are therefore very important.
f. Overlord Cards describe abilities the Overlord can perform. These abilities are explored on the card itself and are the primary method the Overlord effects the players themselves.
g. Monster Cards detail the abilities, characteristics, and statistics of monsters the Overlord will send against the hero players. Monster Cards, similar to Shop Item Cards, have Act I and Act II variants, which will be unlocked as play proceeds.
h. Lieutenant Cards are very similar to Monster Cards, detailing the statistics of more powerful creatures in the Overlord’s dark army. Once again, these have Act I and Act II variants.
i. Travel Event Cards detail events that can occur as the hero players travel.
j. Reference Cards help organise which players have played within a round and also outline the basic rules and order of hero and Overlord turns.
5. Map Tiles
a. These two-sided pieces represent indoor and outdoor locations to be assembled for various quests. Each quest will call upon different map tiles and will use those tiles differently.
6. Tokens
a. Most tokens purpose is self-explanatory. There are tokens to represent damage and fatigue, doorways and barriers, monsters and map features. Some tokens are unique in function and are listed below.
b. Objective Tokens indicate the location of specific quest objectives on the map. These have unique coloration and will be called upon by the text of individual quests.
c. Search Tokens mark the locations that are valid for hero players to “search,” in hopes of locating items or special quest features.
d. Villager Tokens serve as the non-player characters of Descent. These could be shopkeepers, guards, or even special quest-specific characters otherwise not controlled by the players nor the Overlord.
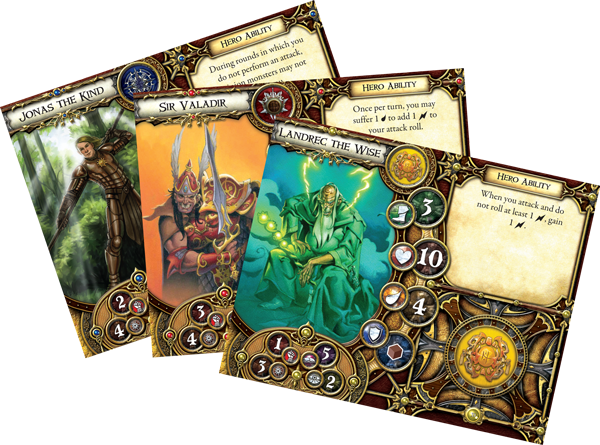
7. Hero Sheets
a. These large, two-sided cards contain all the information about specific heroes. At the top of the card, players will find their hero’s name and archetype icon. Below this will be a series of numbers referring to the statistics of the hero, which effect movement, attack, and defence. In the top right corner of this sheet, players will find their hero’s unique ability and its effects. Below the ability is listed the hero’s feat. Once a feat has been used, the player must flip over their hero sheet to indicate the feat has been expended. Finally, in the bottom left corner, all of the hero’s attributes are listed. Attributes represent skills a hero can employ to overcome challenges during a quest.
Before play begins, all tokens should be punched out of their cardboard, all monster figures should be assembled, and all doors/barriers inserted into their plastic stands. Some monster figurines are quite large and have multiple pieces, but assembly is not overly complex and does not require glue or paint.
Setup
There are three phases of setup for a standard game, which is a game with a single quest. Rules differ for campaigns, but as this is not considered “standard” play, campaign setup will not be explored within this guide. For standard play, setup is separated into a general phase, a hero player phase, and an Overlord phase.
General Setup:
1. Choose Quests
a. This step is relatively straightforward. Browse the Quest Guides, and select a quest to play. The Quest Guides include an introductory quest for new players, in addition to 16 standard quests and 3 quests designed for use with campaigns.
2. Assemble the Map
a. Following the instructions within the Quest Guides, players should assemble the maps as per included diagrams, including all doors and barriers.
3. Choose Roles
a. The most experienced player should play the Overlord, as the Overlord is generally considered to be higher pressure. All other players will be hero players.
4. Prepare Tokens
a. All tokens should be sorted individually according to type and placed within reach of all players, except for tokens specifically indicated by the Quest Guide to be placed on the map.
5. Sort Search Deck and Condition Deck
a. All Search Cards should be shuffled and placed face down within reach of all hero players. Condition cards should be sorted by type and placed similarly.
Once all these steps have been completed, setup can continue to the hero player phase.
Hero Player Setup Phase:
1. Deal Reference Cards and Hero Tokens
a. Hero players should choose one colour-coded reference card, and then gather all the hero tokens that match that color.
2. Choose Heroes
a. During this step, players can discuss and plan which heroes each player will use. Each hero player can choose one hero sheet, and takes the indicated hero figurine.
3. Choose Classes
a. Players should look at their hero sheet and find the “archetype icon.” There are four archetypes: mage, warrior, healer, and scout. Each archetype has two classes available to choose from. Once a player has determined their hero’s archetype, they should choose a class and the corresponding deck of Class Cards.
4. Choose Skills
a. Once decks have been retrieved, hero players should look through this deck to locate starting equipment and the “starting skill” card. The starting skill card can be identified by looking for a card with no experience requirement listed. All other skills should be returned to the box unless playing a campaign.
5. Place Heroes
a. Following the Quest Guides, each hero player should place their hero on the area indicated, usually a designated “entrance tile.”
Once heroes have been placed, it is time for the Overlord to begin their setup.
Overlord Setup Phase:
1. Choose Monsters
a. Inside the Quest Guide there will be a list of monster options for the Overlord to choose from. The Overlord should take all Act I Monster Cards for the chosen monsters, as well as their corresponding figurines. If the Quest Guides designate a lieutenant, the overlord should follow the same steps for the designated lieutenant. Each Quest Guide will indicate special monster rules for that specific quest.
2. Quest Setup
a. The Overlord proceeds to follow the “setup” section within the Quest Guide for the chosen quest. Within this section, there will be instructions for placing map features, non-player characters, objectives, and search tokens.
3. Build the Overlord Deck
a. The Overlord should gather all 15 basic Overlord cards and shuffle them to create their Overlord deck. Other Overlord cards besides the basic cards will only be used in campaigns and should be placed back in the box during standard play.
4. Draw Overlord Cards
a. The Overlord is allowed to draw a number of Overlord Cards equal to the number of heroes in the game.
Once Overlord Cards have been drawn, play can begin!
Gameplay, Turns, and Rounds
Play is separated by rounds of player turns, followed by an Overlord turn. At the beginning of each round, hero players must decide amongst themselves which order the hero players will take action in.
Once this is decided, play proceeds player by player until all hero players have taken a turn. Hero players must finish their whole turn before passing active play on to another player. Once all hero players have taken a turn, the Overlord gets to act.
Hero Turns:
1. Resolve Lasting and New Effects
a. Provided this is not the first turn of the game, any effects which bear the text “until the start of your next turn” end immediately in this phase. Any heroes who have abilities bearing the text “at the start of your turn” can activate their turn.
b. Players should refresh all exhausted cards (exhaustion explained below in depth.)
2. Equip
a. During this phase, players may change out equipment if they so desire. While heroes may possess and carry an unlimited amount of Shop Items, Class Cards, and Search Cards, only a limited amount can be active at any time. Equipment must follow the limitations below:
i. Only 1 item with the “armour” icon can be equipped at a time.
ii. Items bearing the “hand(s)” icon indicate how many hands are required to wield an item. A hero cannot equip items whose total hand icons adds up to more than two (heroes only have two hands!)
iii. Only 2 items with the “ring” icon, also known as “other” items, can be equipped at a time.
b. Items not actively equipped should be flipped facedown.
3. Actions
a. Heroes are allowed two actions per turn. Actions can be performed in any order, however, actions cannot interrupt other actions; a hero must finish one action before starting another. The only exception to this rule is movement, and is explained below. Additionally, heroes are allowed to perform only one action, or perform the same action type twice.
b. Action Types:
i. Move Action
1. The hero is able to move a number of spaces less than or equal to the hero’s speed as listed on their character sheet. This is the only interruptible action, allowing players to move partially, complete another action, and then continue moving.
ii. Attack Action
1. The hero makes an attack on a monster within range. This action is fully explained in the combat sub-segment.
iii. Skill Action
1. The hero is able to activate a Class Card that lists an action requirement.
iv. Rest Action
1. This action allows a hero to heal of all fatigue at the end of this turn. Fatigue is explored more in-depth below.
v. Search Action
1. Provided the hero is located within or adjacent to a space with a search token, the hero may flip the token to reveal its contents.
vi. Stand Up Action
1. A hero who is knocked out is only allowed to take this action during their turn, they cannot take any other actions. Standing up recovers some damage and removes the “knocked out” status. More on this below.
vii. Revive Ally Action
1. This action allows a hero to restore health to a knocked out ally in an adjacent space
viii. Open or Close Action
1. The hero can use this action to open or close a door they are next to.
ix. Special Action
1. This is a catch-all category for quest- or card-specific actions. Any cards that utilise this will indicate that within the text of the card.
4. Turn Reference Card
a. Once a player has had their hero perform all desired actions, the player should flip their card face down to indicate they are finished. Play continues to the next hero or to the Overlord if all other heroes have already finished their turns.
Overlord Turns:
1. Resolve Lasting and New Effects
a. This phase is exactly the same as the hero player’s phase of the same name, except that the Overlord is allowed to draw one Overlord Card during this phase.
2. Activate Monsters
a. During this phase, the Overlord will activate each of their monsters, by “group,” in any order they see fit.
b. Monster Cards and Grouping Mechanic:
i. Monster Cards have a standard layout which guides their play. The Top of the card lists the monsters base statistics (speed, health, and defence from left to right.) Below the stats is the abilities list, the list of dice types used for attacks, and then the attack and act icons. Act two cards should not be used during standard play. On the back of the card will be trait icons, full ability rules, and then monster grouping information.
ii. Group limits are listed with corresponding hero player numbers, and will vary based on this number. The gray box is the hero player number, and the following yellow box is the number of minions that should be in a group. The orange box is the number of master monsters that should be in a group.
c. Each monster in the group should be activated before moving on to the next group.
d. Monsters behave just like heroes, taking two actions per turn. However, monsters may only attack once, unlike heroes. Monsters may also activate unique abilities, open and close doors, and move the number of squares displayed on their card.
3. Turn End
a. Once the Overlord has finished their turn, the heroes can flip their reference cards back to the front side, and then a new round will begin.
Combat, Fatigue, Actions, and Attribute Tests:
1. Hero Combat
a. Declare Weapon and Target
i. When declaring a target, hero players must choose a space they are attacking. The following steps will decide whether the creature inhabiting the space will be hit, or whether there will be additional effects. All attacks require line of site from any corner of the player’s square to any corner of the enemy’s square. When declaring an attack, a weapon to use must be chosen. Weapons each have individual properties, and may be classified as either ranged or melee.
b. Gather and Roll Dice
i. Each weapon will list attack dice on its card and the player should gather these all up in addition to the blue basic attack die and any additional dice granted by abilities.
ii. There are three colours of attack dice:
1. The blue die is the basic attack die and has blank sides and “X” sides. Blank sides indicate a hit while “X” sides indicate a miss. More about this below.
2. Power Dice come in two colours, red and yellow. Each face has a combination of symbols on it. Numeric characters are range points, heart symbols are damage, and lightning bolts are surges.
iii. If the blue basic attack die rolls an “X” symbol, the attack is automatically a miss and none of the other dice matter. If the “X” is not rolled, the attacker should add up all of the heart symbols showing on the dice to determine how much damage is dealt.
iv. Once the attacker has rolled, the defender should roll the dice showing on their monster/character card, adding up all of the shield symbols showing to determine defense score.
c. Check Range
i. For ranged attacks, the attack will automatically miss if enough range points are not rolled (with the exception of a player spending a surge to boost the range results.) The attacking player must count the number of squares between their character and the target, and then must add up the number of range symbols showing on their dice. Range symbols also often display a number which counts as more range on a single die.
d. Surges
i. During the attack roll step, the attacking player may roll dice that land on a lightning bolt icon. These represent surges. Weapons, skills, hero abilities, and items often have unique surge modifiers on which surges can be used. Individual surge rolls can only be used once per roll, though multiple surge rolls can be used to trigger different surge abilities on the same turn.
ii. Surges can be spent to recover a single point of fatigue.
e. Damage Calculation
i. If attacks have been confirmed, the attacker and defender should add up their heart and shield icons (respectively.) Each shield icon cancels out one heart of damage. If there are more hearts than shields, each heart exceeding the number of shields translates into a damage token to be placed on the defending character’s figure. When/if the defender’s damage tokens outweigh that character’s health statistic, the defender becomes “defeated.”
Overlord combat is very similar to hero combat, with a few exceptions. First off, monsters do not use weapons, and therefore all attack die are listed on the monster cards themselves. Additionally, monster surges are listed directly on the card as well, and therefore vary slightly from hero character surges. Other than this, Overlord combat functions the same for each monster.
Some weapons and monsters have one of three listed special attack keywords. Blast attacks deal damage to all spaces adjacent to the target space, and therefore all creatures inhabiting those spaces must make individual defence rolls. Blast attacks can trigger friendly fire!
Pierce attacks are able to pass through a certain number of defender’s shield rolls depending on the number listed next to the word “pierce.” If pierce is applied by multiple sources, (i.e. from a weapon and an ability) the pierce numbers are added together. Reach attacks represent long melee weapons which can hit further than one square away.
These weapons still require line of site, but can attack enemies up to two squares away without requiring range points like ranged attacks do.
Fatigue is an important part of combat. Fatigue is generated when special abilities or skills are used. Fatigue tokens should be placed on the character’s sheet, and only a number of fatigue tokens equal or lesser than the character’s stamina can be placed on the sheet.
If something causes a character to incur fatigue beyond their stamina, those fatigue points become damage instead. Monsters, having 0 stamina, instantly take damage upon receiving fatigue points.
Monsters and heroes handle defeat differently. Monsters which are defeated are considered dead and should be removed from the map after defeat. Heroes, however, simply become “knocked out”. When a hero is knocked out, their sheet should be filled with damage tokens equaling their health, fatigue tokens equaling their stamina, and then their figure should be placed off the map and replaced with a hero token.
Knocked out heroes can take only one action, can have no condition cards active on them, and do not block line of site. The only action a knocked out hero can take is the “stand up” action. The stand up action involves rolling two red power dice and adding up the number of hearts and the number of lightning bolts separately.
The number of hearts rolled will determine how many points of damage the hero will recover upon standing up, and the number of lightning bolts will indicate how many fatigue points will be recovered. The “revive hero” action functions similarly, but allows a fellow hero to help a knocked out ally, granting the same amount of rolls to the knocked out hero.
Attribute tests are the final major component of gameplay that warrants further description. Attribute tests function quite simply: for whichever attribute the test designates, the player must roll one grey and one black defence die and add up the number of shields displayed on the dice faces.
If the number of shields is equal or less than the hero’s listed attribute (on the hero’s sheet) than the hero succeeds. If the shields are greater, however, the hero fails and must suffer whatever consequences are listed in the test’s text.
Overlord players should be aware that monsters, even master monsters, cannot succeed at attribute tests. Any test they are forced to face will be an automatic failure.
Victory
Victory varies from quest to quest. Certain quests have two portions, called “Encounters,” and victory in one encounter does not mean victory over the entire quest. In such quests, players should follow these rules when transitioning from one encounter into the next:
1. Hero Players
a. All damage suffered during the first half carries over
b. All fatigue, however, is recovered
c. All conditions carry over
d. All search cards are kept, and any flipped cards remain that way.
e. All knocked out heroes are allowed a free stand up action
f. Heroes should flip their hero sheet back face-up before the beginning of the second half.
2. Overlord Player
a. All Overlord Cards carry over
When all of these steps have been processed, players should reassemble the map according to the quest text. Players should closely study the win conditions of each quest before gameplay begins, as major changes in play can occur between encounters!
Variants to Play
The most notable variants to play are the two-player game rules, the “Epic” game, and the “Campaign” variant. In the two-player rules variant, the only difference is that the sole hero player receives and controls two heroes and gets a turn for each of them. Overlord play is unaffected in two-player variant rules.
An “Epic” game is a game designed to allow players to reach higher levels without committing to a full campaign. To play this style of game, all the players must agree on a starting “power level.” Power levels add the following changes to the beginning of play:
1. Advanced Level
a. Each hero receives 3 experience points, and therefore receives the class cards those points entail.
b. Each hero receives Act I Shop Item Cards totalling a value of 150 gold.
c. The Overlord receives 4 experience points and the entailed number of Overlord Cards
2. Expert Level
a. Heroes receive 6 experience points, and cards for those points.
b. Each hero receives Act 1 or Act 2 Shop Item Cards totalling a value of 250 gold.
c. The Overlord receives 8 experience points and Overlord Cards to match.
d. The Overlord uses Act 2 monsters and lieutenants
The campaign variant rules are quite advanced and are beyond the scope of this guide for new players.
Additional Resources
Documentation for campaign variants is available on Fantasy Flight Games website, and may interest players who have learned the ropes of standard play.
There is also a fantastic ‘how to play’ video tutorial on YouTube that I highly recommend. You can find the full video below: