Review
-
Game Rating
Introduction to Claustrophobia
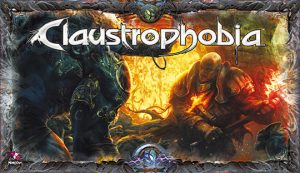 Claustrophobia is a hell-themed asymmetric dungeon crawler based on the popular miniature game Hell Dorado. Both games are published by French games company Asmodée Éditions, with Hell Dorado first appearing in 2006 followed by Claustrophobia in 2009. While Hell Dorado was a wargame in the spirit of games like Warhammer 40k, Claustrophobia took the strategic duel format popular in wargames and mixed it with elements of traditional dungeon crawlers. The resulting game puts one player in charge of a small band of powerful human characters, a party of stalwart fantasy warriors, and the other player in charge of the monsters of the dungeon, a nearly endless legion of demons.
Both Hell Dorado and Claustrophobia garnered praise for their high-quality pre-painted miniatures and their quality art. Players who value visual design or find that art helps set the mood for a game will certainly be pleased; Claustrophobia’s components all bear thematic art and an enjoyable mini story is included within the basic game manual as a lead-in to play.
Claustrophobia, as the name implies, focuses around tight-quarters combat and strategy. Space is limited and motion is restricted in most dungeon maps. Players interested in intense duels of wit and strategy will likely find this game most appealing. In addition, players familiar with wargames may find Claustrophobia a pleasant half-step between pure miniature based wargame and traditional dungeon crawlers.
Claustrophobia is set in the dark and troubled world established in Hell Dorado. It is a world torn by religious conflict, rife with the threat of demonic invasion, with horrors lurking deep beneath the surface of daily life. Set in the city of New Jerusalem, the players will enact a last ditch effort of a warrior-priest locked in conflict with the armies of hell.
Interested players will find this guide sufficient to begin play and understand basic strategies.
Components of Play
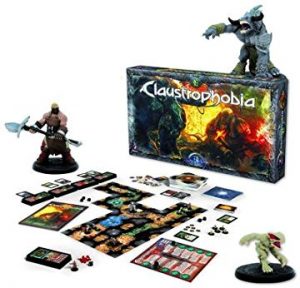
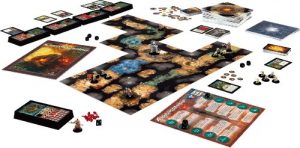
The base box of Claustrophobia contains everything needed to play the standard game. It is a duel format game, meaning the maximum players is two. All miniatures needed for play are included in the box.
However, if players have custom miniatures or Hell Dorado miniatures they’d like to substitute in for flavor, this is completely possible as well. Given that there are multiple forms of the primary demonic enemies in play, additional varied miniatures may add to the enjoyment of the game.
There is a large collection of tiles for constructing the maps outlined by the scenario instructions, which are described at the end of this segment.
The characters (and miniatures) included for play are as follows:
1. The Redeemer (human)
a. The leader of the human faction and the most singularly powerful of all the characters, the Redeemer wields his faith as a weapon and as a light in darkness. He is able to heal his compatriots and grant holy strength to his weapon. His abilities are the most unique and magical in the game.
b. One Miniature
2. The Condemned Brutes (human)
a. A massive warrior wielding improvised weapons, the brute is a force to be reckoned with. His defensive abilities are unmatched, and he uses his size to his advantage, blocking enemies’ movement as they advance towards the party.
b. Two Miniatures
3. The Condemned Blade for Hire (human)
a. A backstabber and a rogue, the Blade for Hire is used to striking from the shadows and moving quickly. He is effective at exploration and dispatching small enemies quickly, but he relies on the brutes to create a distraction.
b. Two Miniatures
4. The Troglodytes (forces of hell)
a. Cowardly and violent creatures, troglodytes strike in packs and under the cover of darkness. They become terrifying and confident once in the shadows of hell, and the greater their number grows, the more powerful they become.
b. Eleven Miniatures
5. The Demon (forces of hell)
a. A beast driven by destructive ambition, his only goal is to destroy the city of New Jerusalem. The demon manifests in many forms and iterations, sometimes a violent ravager, other times a commander. Every scenario brings a different iteration of the demon, and therefore, new challenges.
b. One Miniature
The base box includes a number of unique cards for play, as well as stands to hold them and a number of plastic damage pegs which can be slid into holes in the cards for damage tracking.
For the humans, there are the “warrior cards,” which explain the strengths and role-playing statistics for each of the characters in play. There are 6 “gift” cards, which represent the Redeemer’s magical abilities, and 6 object cards, which represent weapons and armour for the human players.
Finally, there are 15 “advantage” cards which depict formations, orders, and minor items to be used by the humans during their fight for survival.
For the demons, there is a “Board of Destiny” with which to track all the special abilities and statistics of the troglodyte horde. The horde will receive numerous power-ups and changes throughout the game which are present on this board. There are 7 demon reference cards, which represent the different forms the Demon takes in each scenario.
These cards outline statistics and special abilities of each manifestation of the Demon. The demon inventory also contains 16 “event” cards which describe traps and treachery the Demon can spring upon his human foes.
Claustrophobia also comes with a large collection of unique tokens. Most of these are used to help visualize effects put into play by powers, events, or special scenario features (like treasure.) In addition, there is a booklet outlining the various scenarios that can be played from the basic box. These scenarios will not be individually explained during this guide. Instead, this guide will focus on general gameplay rules and allow the individual stories and surprises of each scenario for interested players to discover.
Scenario sheets contain special set up information, the list of available forces for both human and demon teams, back story, and instructions for setting up map tiles. The official manual recommends first time players play through “The Survivors” scenario first, as it is designed specifically as an introduction to the game.
Setup and Gameplay
In Claustrophobia, setup is outlined on a per-scenario basis. This will include the construction of the dungeon map, the choices of character, and the preparation of various materials for the Demon’s powers. These instructions are outlined in detail on each scenario sheet.
Universally, however, event and advantage cards should be shuffled and placed set down in two independent decks, then all character reference cards should be placed into their stands for proper damage tracking. In addition, once the basic map has been constructed based on the scenario instructions, all map tiles should be shuffled and placed into a stack face down.
Gameplay progresses round-by-round in four phases, two for humans, two for demons. However, before phases can be described in detail, players must understand some of the core concepts behind the cards and tokens used in play. The first of these concepts is the “Line of Action.”
On each human character card, there are six images of six-sided dice (d6). Each image depicts a different face number of pips (1 – 6 for all the sides of the die), and following the image of the die is a list of statistics.
These are the “Lines of Action,” and they determine nearly everything a human character will be able to do during the next phase. Lines of Action are a key part of the strategy of the game, as allotting certain die to a character could change the flow of battle significantly.
Lines of Action depict three numbers marked “MVT” for movement, “CBT” for combat, and “DEF” for defence. In addition, there is a small hole next to each Line of Action which represents damage taken. The implications of the individual scores and damage will be explained below in the section on combat and action.
For demon players, the Board of Destiny is as important as the Lines of Action. At the beginning of each round, the demon player will roll three d6 and can apply these towards special effects on the board.
Each effect has a circle next to it outlining its “cost.” For example, the special ability “A Taste for Blood” requires dice adding up to exactly 7 must be spent in order to use this ability.
Certain abilities (such as A Taste for Blood) are marked red, which means they can only be used once per scenario.
Demon players also need to be aware of summoning rules. In order to summon monsters, the tile they are going to place the new monsters on must have one unexplored opening, meaning it must have one path leading to a yet-unrevealed space of board.
The tile must have no human warriors currently in it, and it must follow movement restriction rules which will be explained in full detail in the movement paragraphs below. In addition, the demon player needs to spend “threat points” or “TP” in order to summon monsters. Troglodytes cost 1 TP and Demons cost 5 TP.
Threat points can be generated in numerous ways, but the simplest is through the “Sounds from the Deep” ability on the Board of Destiny. This ability is reusable and allows demon players to spend allotted d6 in order to add threat point tokens into their inventory.
Now that some of the passive concepts of the game have been established, the phase order and options can be laid out sensibly:
1. Initiative Phase (Human)
a. At the beginning of this phase, the human player will roll a number of d6 equal to the number of active warriors they have. These will be used to determine their characters “Lines of Action” and can be distributed freely once rolled. The human player is free to assign rolled dice to whichever character fits their strategy best.
b. The Redeemer’s “gifts” which are determined by scenario, are tied to Lines of Action, so the human player should keep careful eye on which die they are placing on which character.
2. Action Phase (Human)
a. During the action phase, the human player can choose to activate and use their warrior in any order they choose. However, once a warrior is activated, that warrior must complete its full turn before the next warrior can take action. A warrior must move before or after combat. Combat cannot take place in the middle of a move. Warriors to not have to be activated every turn and can choose to pass action for that turn. Combat and movement will be explained in detail below.
b. Exploration occurs during this phase, explained in full detail below.
c. Advantage cards may be played during this phase.
d. Object cards can be used by warriors during this phase as well. Abilities of objects varies based on the card used. Objects cannot be transferred, dropped, or destroyed (except by character death.)
3. Threat Phase (Demon)
a. When the threat phase begins, the demon player will roll 3 d6 and apply them to the Board of Destiny as desired, resolving the effects described on the board. After Board of Destiny actions have been resolved, the demon player can expend TP to summon monsters as per the monster summoning rules.
b. Event cards valid for play during the initiative phase can be played now, though many will take place during different phases as outlined on the cards themselves.
4. Action Phase (Demon)
a. The action phase for the demon is identical to the action phase for the human except that the demon forces cannot conduct exploration.
Movement:
There are a few factors that require full explanation. The first of these is movement. No character ever has to be moved, and a player can expend as much of that characters move score as desired, though, as mentioned above, movement cannot be split before and after combat. Movement from one tile to another adjacent, connected tile costs 1 MVT. Total MVT for each character or creature is listed on character cards, demon cards, and the Board of Destiny.
Movement is limited by two key rules:
1. Tunnel Size Rule:
a. No tile can contain more than 3 characters from each team.
2. Blocking Rule:
a. A character can only leave a tile inhabited by enemy characters if there are at least as many warriors from their side as there are enemies.
b. This means that if there are two human warriors facing off against two troglodytes, only one human warrior will be able to retreat. The other one will be blocked into the square and forced to fight alone against the two troglodytes. The reverse would also be true.
Exploration:
During the human action phase, characters can be sent into an unrevealed segment of map, so long as the current tile has a valid opening. Exploration costs 1 MVT. The human player will draw a new tile from the facedown stack of tiles. They will then pass this tile to the demon player, who is allowed to study it and place it as he wills, with only two restrictions. The demon player cannot place a tile such that movement is blocked. Openings on a tile must match openings. Additionally, if a drawn tile leaves the board with no unexplored openings that tile must be discarded until a tile with an unexplored opening is drawn.
Sometimes, exploration will reveal a “special tile” which will have a threat or trap on it. These special rules warrant further explanation:
1. Stash
a. This tile is a special tile in certain scenarios. See scenario text to see if this tile has special effects or not.
2. Hungry Tunnels
a. This space doubles all damage taken by successful hits.
b. Note: this special effect does not apply to the “grenade” special object
3. Tight Tunnel
a. This tile has restricted space, meaning only one warrior from each team can be present.
4. Flooded Tunnel
a. This tunnel immediately ends a character’s movement, regardless of whether or not they have points remaining. Leaving this tile costs all of a characters movement points.
5. Booby-Trapped Tunnel
a. Only effects humans
b. When a human warrior enters this tile for the first time, they must throw a d6. The result will indicate the effect.
i. 1 – nothing Happens
ii. 2 or 3 – the character receives one hit worth of damage
iii. 4 – the character immediately ends their movement
iv. 5 – a troglodyte is immediately summoned in the trapped tile
v. 6 – the character receives two hits worth of damage
6. Demonic Mechanism
a. Only effects humans the first time they enter this tile
b. Grants the demon player an additional d6 during their next threat phase
7. Pentacle Room
a. This extra-large room can house up to five characters from each team
8. Exit
a. Similar to the Pentacle, this room can house up to five characters from each team
9. Lair
a. This square is always viable for troglodyte summoning, regardless of whether there is an unexplored passageway attached or not
10. Hole in the ground
a. When this tile has been revealed, the demon player is allowed to place a “hole in the ground” token on another active tile. Troglodytes are allowed to move instantly from one square with a hole to another, costing only 1 MVT. Blocking has no effect on this, so it works as a hasty escape for troglodytes.
Combat:
When combat is declared by a player, that player may choose any target within their square, or within reach of any special weapons they possess. The exception to this rule is when engaging combat with troglodytes.
Troglodytes are treated as a single target no matter how many are in a tile, adding their statistics to result in them being significantly more powerful in groups. When engaging in combat, the player rolls a number of d6 equal to the character’s CBT score. A hit is registered when a die is equal or higher to the defending character’s DEF score.
Once hits have been registered, damage must be resolved. This varies based on what character is taking the damage:
1. Troglodyte
a. A single hit will kill a troglodyte. For groups of troglodytes, remove one troglodyte for each successful hit the attacker makes against the troglodyte horde.
2. Demon
a. Upon taking damage, a wound token must be placed on the active demon’s character card. Once the number of wound tokens on a card matches or surpasses the demon’s listed health score, the demon is destroyed.
3. Humans
a. Successful hits against a human warrior requires the human player to place a damage peg into the slot at the beginning of one of their characters Lines of Action. This line then becomes “cancelled” which means that activating that Line of Action in the future will result in that character becoming “exhausted,” skipping a turn and temporarily having a lowered DEF score of 3. If a human character accumulates 6 damage pegs, they die permanently.
b. Note: damage caused by special effects during the initiative phase do not exhaust the player for the action phase immediately following. All Line of Action cancellation occurs the initiative phase after damage is received.
Victory
This section will be unusually small! While victory for the demon player involves defeating all human players and removing them from the game, human victory conditions and additional demonic victory conditions vary greatly depending on individual scenario. Therefore, there is no straightforward victory condition for Claustrophobia.
Expansions
There are two full expansions to Claustrophobia published by Asmodee games.
Claustrophobia: De Profundis adds a large collection of new events, objects, and magical abilities to the game as well as four new character types with painted miniatures included in the expansion boss.
In addition, the De Profundis expansion adds twelve new scenarios, massively expanding the replayability of Claustrophobia.
Claustrophobia: Furor Sanguinis is a smaller, but very unique and interesting expansion. Furor Sanguinis adds just one new character, and only six new scenarios; however, the new character is a completely unique ultimate monster. The “Kartikeya” is a rampaging, bloodthirsty creature who metes out its wrath on both human and demon alike.
In Furor Sanguinis scenarios, one player will play just as this single powerful monster, evading capture and turning demonic and human forces into comparatively meek prey. Only through careful planning and strategy will the demon or human player be able to overcome the sheer strength of the Kartikeya.