Review
-
Game Rating
Introduction to Mage Knight
![]() Launched in 2000 by gaming great WizKids, Inc., Mage Knight is the first recognisable collectible miniatures game to hit the tabletop scene. It launched with great success, and WizKids has since gone on to create numerous other games following the basic format of Mage Knight, including the incredibly well-renown HeroClix and MechWarrior games.
Launched in 2000 by gaming great WizKids, Inc., Mage Knight is the first recognisable collectible miniatures game to hit the tabletop scene. It launched with great success, and WizKids has since gone on to create numerous other games following the basic format of Mage Knight, including the incredibly well-renown HeroClix and MechWarrior games.
Heroclix merged interests of the gaming community with that of the comics community by making the basic play pieces of the game collectibles in and of themselves.
Each HeroClix figurine was a high-quality and painted miniature of an established comic book character. Mage Knight was where this phenomenon began.
The core innovation Mage Knight brought to the table is called the “combat dial.” This is a clicking disk set into the base of the figurines. The base of the figurines have a window through which various statistics set into the disk can be seen.
As the figurines do combat, the dial can be clicked to represent diminishing strength, healing, or empowerment.
This also means that many core statistics are kept with the figurines themselves, cutting down on the amount of printed materials the game requires to have on hand to play. While early versions of the game do not have this feature, most modern versions of the game have this feature.
Mage Knight is likely to appeal to players with a love of strategy and army building. It falls into the realm of miniature warfare games like Warhammer 40k, but doesn’t require nearly as much of a time or capital investment to begin play. All miniatures except for a small, unique unpainted line come pre-printed, and, as mentioned above, with their unique statistics contained within the base of the miniature itself.
In addition, the game is designed to be fast paced, favouring quick skirmishes to prolonged battles or sieges. Army size is extremely variable and is decided before play by the players, which means that even players with only a base set can enjoy the game.
The figurines can be collected through a number of starter packs and expansion-based boosters. Since 2000, there has been 14 expansions through booster sets, in addition to standalone add-ons to the game.
Starter packs contain eight to nine figurines with a copy of the rules and necessary dice while booster sets tend to have four or five figurines of varying rarity. Rarity of figurines is determined on a seven-level scale. The lower the number the less rare, and likely the less individually powerful, a piece is.
Level six rarity figurines are considered “uniques” of which only one can exist in any constructed army. Level seven rarity figurines are incredibly rare and only produced in very limited quantities.
In addition, there are some extra-large figurines which are sold stand-alone and have advanced combat dials to add variety and challenge to play.
For the sake of clarity, this guide will focus primarily on the rules and play of the base game. The numerous expansions to Mage Knight added an incredible amount of variety to play, in addition to scenarios, special rule sets, and new gameplay features, but are so expansive that delving into them in depth would not be beneficial to an interested new player.
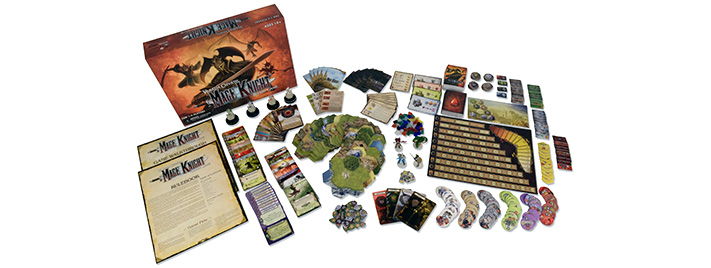
Components and Number of Players
Mage Knight is wholly based around scenarios laid out in the main manual and in various expansions materials. Because of this structure, the valid number of players will vary from scenario to scenario, including some scenarios which can be played alone with a solo rules modification.
In addition, playtime greatly varies between scenarios depending on the type of map, skill of players, and individual scenario goals. Before playing, interested players should browse the scenario booklet included in the box and consider these variances carefully.
The booklet does include a tutorial scenario designed for 1-4 players, which may be helpful as a quick introduction to the game.
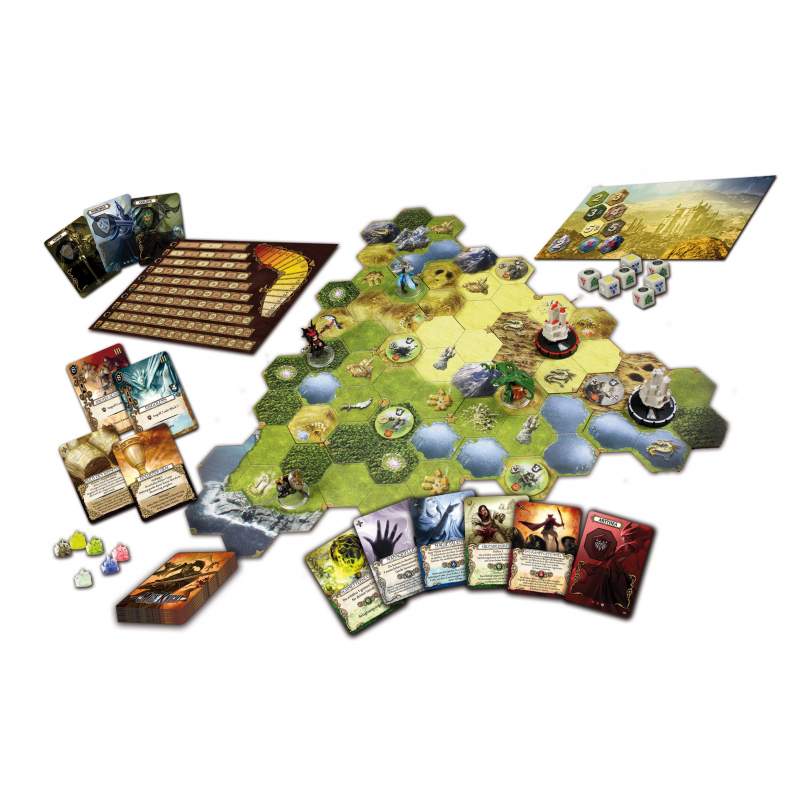
The base Mage Knight box contains a large variety of pieces. The first of these that are due explanation are the map tiles. These tiles are hex-based geometric pieces that depict various geographical features including cities, obstacles, mountains, and forests. Countryside tiles are coloured green on the back of the tile and are distinct from “core” tiles.
Countryside tiles represent wilderness and less developed land, while core tiles represent complex or civilised portions of land. Core tiles can include dungeons, large cities, and other features offering advanced challenges for players who enter them. Core tiles have a brown coloration on their back, which can help identify them for revealing tiles as the game goes on without revealing their specific contents.
In addition to land tiles, there are tokens representing dynamic and randomised features of each scenario. These tokens are separated into “ruin” tokens and “enemy” tokens. Enemy tokens can represent all kinds of enemies based on scenario, from roving bands of thieves to rampaging, large monsters.
Ruin tokens represent traditional fantasy lairs in which monsters may lurk. Ruins can be as simple as crypts or as threatening as a magician’s tower. These tokens will be laid out according to scenario, but provide a lot of variety between each play-through of a specific scenario.
The next major component of play are the various types of cards included in the base box. Each type of card has a different function, though there are a number of guiding archetypes of cards in the box.
1. Hero Card
a. This card indicates which player is in control of which character figure. They also act as an active inventory space, having illustrated slots for various tokens used for play.
2. Deed Cards
a. Deed cards are the backbone of player action in Mage Knight. There are five sub-types of deed card and all of them will inhabit their own individual draw pile.
i. Basic Action Cards1. In the base game, every character figure comes with its own deck of 16 action cards. These cards are identifiable by a “shield” icon in the top right of the card. The decks of basic action cards are almost identical, except for a single card unique to the currently played hero. These represent simple moves any character can reasonably accomplish.
ii. Advanced Action Cards
1. In the base game, there are 28 advanced action cards which represent more complex and powerful actions a character can perform. These cards have a golden frame and no corner icon. Advanced action cards will be attained by players through various actions explained in the following segments.
iii. Spell Cards
1. These violet-framed cards describe spells a character can attain throughout the game. Spells are very powerful and have large impact on play. Spell cards are split into two descriptions: the basic spell, and the ultimate version which can only be cast during “night” rounds.
iv. Artefact Cards
1. These are the single most powerful cards in the game. They are framed in gold and have large, two part text boxes. Each artifact has two effects, one weaker effect that can be used repeatedly, and one ultimate effect which will destroy the artifact upon use.
v. Wound Cards
1. Wound cards have a simple design depicting a drop of blood. These cards are used both to indicate injured units on the map, as well as to depict character injury. Wound cards function as dead space in a player’s hand, limiting what that player can do with their injured character.
3. Unit Cards
a. Regular Unit Cards
i. These silver-backed cards describe basic units that can be conscripted by players. At the beginning of the game, a “unit offer” will be drawn which will determine what regular units will be available to recruit. The parameters of the unit offer can change between scenarios.
b. Elite Unit Cards
i. These are more powerful units available for recruit in certain scenarios. Most scenarios besides the first will contain elite unit offers.
4. Tactic Cards
a. Tactic cards provide information about turn order, special effects, and advantages during a round. They are chosen at the beginning of the round by a certain set of rules which will be explained below. Tactic cards with large numbers provide large advantages, but push the player further down the turn order chart.
5. Site Description Cards
a. Site description cards provide information about specific map features. Ruins, villages, etc. will all have site description cards which outline what that location offers in regards to advantages, disadvantages, or special challenges.
6. City Cards
a. City cards are similar to site description cards in that they describe what special offerings or bonuses can be taken advantage of while in a city.
7. Achievement Scoring Card
a. This is a simple reference card which can be provided to players outlining what accomplishments contribute to end game scoring and win conditions. This card references the general win conditions, and additional win conditions might be added on a per-scenario basis.
8. Skills Description Card
a. This card outlines the skills of each hero in the game. They are hero specific, and will be used in concordance with skill tokens and level tokens.
There are also a large variety of tokens included in the box that deserve full explanation much like the cards:
1. Round Order Tokens
a. These tokens will be shuffled and dealt to players at the beginning of the game. They will help determine in which order certain actions in rounds are processed.
2. Level Tokens/Command Tokens
a. These tokens are used to track character level and should be placed in a stack on the Hero card in ascending order, face up. At the beginning of the game, the 1-2 token should be visible for all players unless a scenario otherwise overrides that rule. On the back of every level token is a shield symbol. Once a level has been surpassed, the level token should be flipped and placed next to the level token pile. Symbol-side up tokens become “command tokens.” There is one token in every hero’s stack that has a symbol on both sides and this should be placed next to the pile at the beginning of the game, representing a single command token.
b. Command tokens indicate a player’s command limit, or how many units they may have active at any time. At the beginning of the game, players may only have one unit active, and they will unlock more as the game progresses.
c. Level tokens also display basic hero statistics. For each level, a hero will have an armor score (indicated by a number on a shield icon) and a hand-size limit (indicated by a number on a golden card icon). These will have significant impact on play.
3. Shield Tokens
a. These tokens generally represent accomplishments in the game. Two shield tokens should be set aside for use on the “Fame and Reputation board,” and the rest should be kept on hand for indicating strategic accomplishments. Shield tokens can indicate fortified or conquered sites, captured cities, and the like.
4. Skill Tokens
a. These tokens are used in concordance with the skill description card, and will be awarded upon levelling up. Skills help represent a characters advancement in power as they level up.
Another incredibly important component of play is the “Fame and Reputation” board mentioned above. All players start the game with 0 fame, and will gain fame as they have successes during play.
The Fame and Reputation board guides player levelling, indicating at what fame totals a player should move to the next level token, and at what fame totals new skills will be unlocked. The left side of the Fame and Reputation board tracks Fame, which is only gained, while the right side of the board tracks Reputation, which both rises and falls.
Reputation will change depending on certain actions, violent or cruel actions towards the civilian populace of the map will move the player’s token towards red, while merciful or heroic acts will move the player’s token towards white.
The last set of components included in the box is the “Day/Night board” and the mana tokens, dice, and crystals. Scenario rules will decide which side of the Day/Night board should start face up. Gameplay changes depending on the time of day, with the biggest changes being to movement costs and mana rules. On the left side of the Day/Night board, all movement costs are laid out by tile type.
The right side of the board is space for where the mana dice will ultimately be placed.
There are six types of mana, four basic and two special. The types are as follows:
1. Basic
a. Fire
b. Water
c. Earth
d. Wind
2. Special
a. Sun
i. This day-only mana type is a “wildcard” and can be exchanged for any basic mana requirement.
b. Darkness
i. This night-only mana type is powerless on its own, but acts as an amplifier, allowing spells to advance to their ultimate form.
These mana types are represented by tokens, dice, and crystal pieces. Tokens are temporary and represent magical power that must be used before the end of a turn. Crystals can be stored (up to a maximum of 3 total) in a player’s inventory and used in a later turn.
Sun and Darkness mana types cannot be stored in crystals, and must be used efficiently as they are gained. Dice are used to determine a round’s “Source.” The Source is a common pool of mana all characters can draw from to cast spells.
The dice for the Source will be rolled at the beginning of the round and vary based on the number of players in the game. Dice in play should always equal the number of players plus two.
On a player’s turn, they may pull one die from the Source. When it is used, it must be rerolled and then placed back into the source. During the day, any black Darkness mana dice are not rerolled and become useless “depleted” dice. At night, the same applies for gold “Sun” mana dice.
Setup, Rounds, and Turns
Because Mage Knight is structured around varied scenarios, setup will change depending on the scenario limitations or special rules. However, in general the following process should guide setup:
1. Establish Initial Position
a. The first tiles of the map should be placed according to the scenario guidelines. These tiles will start revealed while all further tiles will be revealed as play continues.
2. Place Components
a. All decks, boards, cards, and environmental tiles should be placed as per the diagram in the manual. Deed cards should be separated by type and then individually shuffled. Only wound cards should be placed face up out of the deed cards.
b. Unit, spell, skill, and advanced action offers should be dealt according to the scenario rules and placed according to the diagram in the handbook.
c. All dice and mana tokens should be placed in the bank until the first round is prepared.
d. Once the first round is ready to begin, mana dice should be rolled and placed onto the Day/Night board.
e. Players should place one of their shields on the Reputation track and one on the Fame track.
3. Determine Round Order
a. For the first round, round order tokens for each character should be randomised and placed down next to the play area. In the order they are laid out, each player will then choose from the tactics available. Tactics are weighted with turn order numbers. Lower numbers go first, though may not be as powerful as larger numbered tactics.
b. Once tactics have been chosen, rearrange the round order tokens to match the new turn order.
Once turn order has been established, players progress with their turns as determined by the new round order. Turns continue, in order, in a cycle until at least one player has no more cards remaining in their Deed deck.
If this player has cards remaining in their hand, they may play with those cards as usual, progressing to the next player after they are done, or they may call for the end of the round. Calling for the end of the round immediately ends the active player’s turn and passes to the next player.
All other players are allowed to play one final turn, in order, and then the round ends. The day/night board should be flipped, and mana should be re-rolled as per usual round setup.
Individual player turns have their own rules and limitations. During a turn a player may move their figure and either perform an action or wait.
Movement cannot be split, with an action in between moves, and only either a fight or interact action may be taken, not both. Both fighting and interaction will be explained in full in the gameplay segment.
At the end of a turn, a player should take the following actions:
1. Discard all cards played that round
2. Return mana back to the Source (omitting unused crystals in the player’s inventory)
3. (Optional) discard any number of cards except wound cards before drawing.
4. Draw cards from the player’s Deed deck up to their current card limit.
Gameplay
This section will be broken up into a number of subsections which describe in full various actions which will unfold during players’ turns.
Playing Action Cards:
As described in the components section of this guide, action cards are the backbone of play. These cards have five types:
1. Movement – Depicted by a Boot icon
a. Can only be played during the movement portion of a turn.
2. Influence – Depicted by an Ear icon
a. Can only be played while undertaking an “interact” action
3. Combat – Depicted by an X icon
a. Can only be played while undertaking a “fight” action
4. Special – Depicted by a Star icon
a. Can be played at any point during the turn according to their individual effect
5. Healing – Depicted by an Open Palm icon
a. Can be played at any point during a turn, except during an active fight
When cards are played, they should be moved from the hand to the active play area. Many cards have “empowered” options that cost mana. Action cards can be stacked in order to provide more powerful strategic effects.
For example, a number of move cards can be stacked on top of one another to allow the player to move their character much further than would be possible with a single card.
In addition, cards can be “played sideways.” This is a tradeoff that allows for special action in times of need. Playing a card sideways disregards both its type and its effect and allows the player to play it as any action with a single point of action.
For example, a block card played sideways during the movement phase would instead add 1 move to the player’s move total. Cards played sideways cannot be empowered, as all their text is considered ignored once played sideways.
Movement:
Base movement costs are depicted on the day night board by hex type. A player wishing to move multiple spaces will need to add up the move cost totals and play movement action cards equal or greater than that amount. There are however, some special rules and situations players should be aware of.
First off, other character figures can be passed through at will. Movement, however, should not end in the same space as another figure, unless playing a scenario including player versus player combat.
In addition, entering a space with an enemy unit is not permitted unless that unit is defeated in combat.
Moving around enemies is also very dangerous as it provokes movement based attacks. If a player moves their figurine from one space adjacent to an enemy to another space next to that enemy, that enemy can attack the player, ending movement immediately and initiating combat. This counts as a player’s attack action, so provoking enemy attacks should be done with great caution.
Exploration of the unrevealed portions of the map is quite simple. When a player approaches the open side of a tile, they must announce which direction they wish to move into the unknown and then draw a new tile from the tile deck.
Exploration of a new tile costs 2 move points. A new tile must match the symbols on the already visible edge and the direction of the art must align with the rest of the map. After exploring, a player can continue movement as usual.
Interaction in Cities and Villages:
In villages and cities, players can use their Influence cards to gain benefits of that village. Players receive a bonus or a penalty for their stance on the reputation track, so keep this in mind. Having a reputation marked with an “X” means a player has angered the people of a village and cannot gain the benefits of that town.
Villages and cities have many offerings including healing and recruiting units. Only units marked with a village icon can be recruited from a village, and those units must have been drawn into the unit offer during the setup phase of each round.
Unit costs are listed in the left corner of the card, and cost exactly that much influence to recruit. The number of units a player can recruit is limited by their Command limit (described above).
If a player desires a different unit, but does not currently have the command tokens to control both units, they are allowed to disband and discard their unwanted unit and recruit the new unit they desire.
There is also the option to plunder villages. This option is only available when a player ends their turn in a village or city. Once their turn ends, but before the next player takes action, a player may declare they will plunder a village. They immediately gain two bonus cards from their Deed deck and reduce their reputation by 1. This gives the player a significant card number bonus for their next turn.
Cities, in the scenarios they exist in, can be sieged and conquered, with great reward going to the player or players who manage to accomplish such a task.
This, however, is specific to more advanced scenarios and will not be explored fully in this particular guide. Full explanation of city conquering can be found in the handbook, and in scenario specific materials. Beginner scenarios do not contain cities.
Healing in a village is incredibly important for removing wounds from units and from players’ hands. Village healing costs will be listed on the village’s description card and can be combined with spells and unit special effects to boost healing totals. Each point of healing removes one wound card from the hand or units. Healing points can be split as the player sees fit.
Interaction with “Adventure Sites:
Adventure sites are special map features like dungeons, mage towers, and monster dens. These sites require an action to interact with, but have unique offerings and effects. Often, they offer similar offerings to a village, but empowered in some way.
Each of the location cards for these features describes their unique bonuses and challenges. Players should be aware that choosing aggressive action on these sites will most certainly result in challenge – and possibly incredible rewards.
Players can enter an adventure site space without having to interact with it.
Combat:
Enemy tokens will be the primary challenge players will face in most Mage Knight scenarios. On the top of each token is the enemy’s defence score. A player will need to have as much attack or more as an enemy’s defence in order to hope to win against that enemy.
On the left side of each token is the enemy’s attack score. This number represents how much damage will be done to a unit or character, or how many block points are required to prevent damage. On the bottom of the token is the enemy’s fame value, which will be added to a victorious player’s fame totals.
Finally, the right side of the token depicts any special abilities the enemy may have (these can be referenced on the enemy’s informational card or in the combat glossary of the base game handbook). Defeating certain enemies may also grant reputation points, depending on the scenario.
Combat is the most complex aspect of play by far. Combat has four phases in which action cards, spell cards, and unit cards can be used. Units are not discarded when used, but cannot be used more than once in a single turn, unless a special card overrides a unit’s spent status.
The phases of combat are as follows:
1. Ranged and Siege Attack Phase
a. In this phase, a player can use cards indicated as ranged or siege in order to weaken an enemy before the real fight begins. Sometimes, with enough power, a player can eliminate the enemy units before proper combat begins.
b. Ranged and Siege attacks can be stacked together, and can be stacked with certain types of empowering magic. They cannot, however, be stacked with non-ranged attacks. Non-ranged attacks cannot be laid sideways to generate ranged attacks.
c. Players should keep in mind that ranged attack totals that do not add up to more than the enemy’s defence will have no effect, and therefore should not be wasted.
2. Block Phase
a. Any enemies remaining after the Ranged phase now attack. The player may now play block cards in order to resist damage incoming. Blocks cannot be partial, the block card totals must add up to more than or equal to the incoming attack totals!
3. Assign Damage Phase
a. Unblocked damage must be assigned by the player. A player can direct damage either to their own hand (the player’s character) or to units. Only currently unwounded units may accept damage, and accepting damage makes a unit wounded and unusable until either discarded and replaced or healed.
b. If a unit takes damage, place a wound card over the unit until it is healed, then reduce the total incoming damage by the armor score of that unit. Sometimes, sacrificing high-armor units can save the player’s hand from filling with wound cards!
i. Note: Some units are “resistant” meaning they have an additional icon of a fist next to their armor listing. Resistant units subtract their armor from the incoming damage before becoming wounded, meaning they have a chance to negate incoming damage entirely without taking any wounds.
c. If the player character takes damage, they must take a wound card, subtract their defense score from the damage total, and then continue taking wound cards and subtracting damage until all the damage has been assigned. The easiest way to calculate this total is to divide the total incoming damage by the player character’s armor, and then adding that number of wound cards to the player’s hand. The number must always be rounded up.
4. Attack Phase
a. In this phase, any standard attack cards can be played. In addition, ranged attacks can be substituted in for normal attacks, even though the reverse is not true.
If, during combat, your character takes wounds equal to or greater than the total hand limit listed on a character’s current level token, that player must discard all non-wound cards from their hand.
This is a very dangerous position for a player to be in! Starting a turn with a full hand of wounds means a character is exhausted and must rest, which is described at length below.
While player versus player combat is not advised for new players, it is rather straightforward to add to a game. Instead of the usual four combat phases, there are only two phases in player versus player combat.
The Ranged and Siege attacks phase is taken by the defender first, then by the aggressor. Block values in the player versus player Ranged phase are halved, however, in player versus player blocking can block partial damage, functioning as negation of damage as opposed to a threshold.
The second phase in player versus player is the Melee phase. In this phase, the aggressor moves first, followed by the defender. Damage dealt during this phase does not have to actually wound the other player if the victor does not desire it.
Damage can be used to force the other player out of the hex or, in certain scenarios, to steal valuable items from the other player (this is explained in depth in the standard handbook for the scenarios it applies to).
The final difference between standard combat and player versus player combat is that damage is assigned by the one who dealt the damage. Damage is rounded down in this version of the Damage phase, in the favour of the defending character.
Resting:
A player may choose to have their army rest instead of taking normal actions on a turn. Resting allows a player to discard one non-wound card, and as many wound cards as they would like.
However, when discarding wounds in this manner, they go into the standard discard pile for the Deed deck. Resting is not the same as healing, and the player must still endure the risk of having unhealed wounds show up again in their deck at a later round (unless they are healed at a later point).
Healing removes wounds back into the wound pile, whereas resting only clears them from the hand and moves them into the discard pile for the current round. Remember, at the end of every round the discard pile for the Deed deck is re-shuffled, including any non-healed wound cards.
Exhausted characters forced to rest must reveal their hand to the table, and can only discard one Wound card. An exhausted character can, however, use healing actions of units under their control, despite being unable to take advantage of spells or village healing.
Leveling Up:
Level ups occur at the end of the turn in which a player accrues enough fame to attain a new level. A player must level before drawing new cards, and must resolve all levelling (if multiple levels are surpassed) at that point.
Certain levels will earn characters new skills, which are character-based abilities that empower a character in unique ways. When a character reaches a skill earning level, the player should draw two skills from the top of their pile.
They can choose one of these skills to add to their character. The other skill will be placed in the “common skill offer,” meaning players levelling their characters subsequently will be able to choose from discarded skills to empower their character.
If a character chooses a skill from the common skill offer, both drawn skills must be placed into the offer in exchange for one from the common skill offer. Regardless of choice, a character only gains one skill per earned skill level.
In addition to gaining a skill, when a player hits an earned skill level, they get to take an advanced card from the advanced card offer. When they choose one, they add it to the top of their deed deck, and then draw a new advanced card. Advanced cards should be shuffled downwards, as the newly drawn advanced card should always be on top of the offer.
Levels can only be gained up to level 10. A character can keep gaining fame, but they will not level beyond the maximum. Gained fame still contributes to a victory, even if it does not further empower the character.
Victory
When a scenario’s end condition is reached, players complete one more turn each and then the game is concluded. Players should add up their total fame and then consult the aforementioned scoring reference cards.
These cards outline a number of end-game bonuses to be handed out to players. For example, there is a reward of two fame per artefact and one fame per two crystals possessed by any player; the player with the most artefacts and crystal pairs gains an additional 3 fame.
Whoever has the most fame after all fame bonuses is the winner!
Additional Resources
Although a little dated, YouTube user ‘rahdo’ has a superb walkthrough video of how to play Mage Knight and it’s a highly recommended watch.