Review
-
Game Rating
Introduction
 Zombicide: Black Plague is the medieval fantasy spin-off follow-up to game publisher CMON’s successful Zombicide tabletop game, published in 2015 after a remarkable fundraising start. Both games were the products of remarkably successful Kickstarter campaigns, raising enough money to land them both within the ten most well-funded tabletops in all of Kickstarter’s history.
While the original Zombicide took place in a post-apocalyptic modern day setting, pitting players against hordes of infected, Black Plague sends the players back in time to confront necromancers and their undead hordes. All players and monsters are featured by high quality figurines, which were major contributors to Black Plague’s Kickstarter success, and a number of bonus features, extensions, and expansions were funded from the get-go due to the incredible success of the campaign.
Interested players will find an incredible amount of content to explore, including a full-size expansion known as Zombicide: Wulfsburg. Additionally, there were considerable advancements in gameplay in comparison to the original Zombicide. Black Plague features “leadership” units which can direct and multiply the power of zombie minions as well as a wide swath of new equipment types, environmental interactions, and scenario features.
Black Plague offers fast-paced and challenging cooperative play with variable board constructions. As scenarios progress, enemy groups grow stronger and more numerous, bringing to life the nightmare/fantasy of facing off against a truly endless horde and finding a way to survive. Players looking for a game with high amount of ‘replayablility’ will likely find Black Plague a satisfying experience.
Number of Players, Components, and Playtime
Adding to the aforementioned flexibility of Zombicide: Black Plague is the variability of player count. Black Plague can be played with up to 6 players, and can also be played solo, as the rules allow for scenarios in which players control more than one “survivor.” Playtime varies based on scenario and number of players, with most games falling between one and two hours of play.
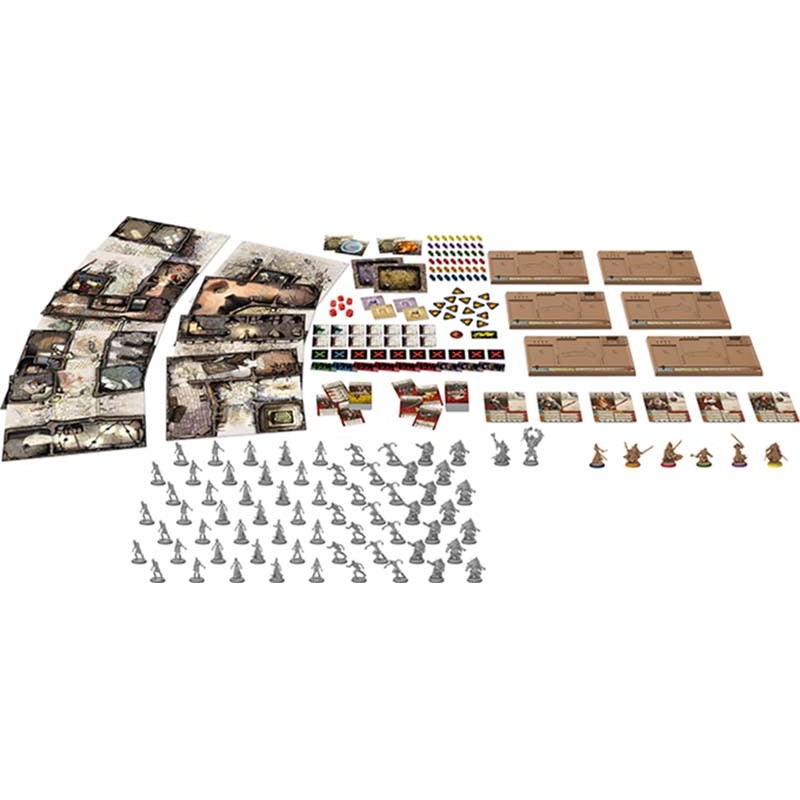
The base box components are refreshingly simple, with all monsters and survivors having their own figurines, and cards being very clearly organised. Despite the relative simplicity of parts in comparison to other games of the type, there are a number of components worthy of summary:
1. Figurines
a. 6 miniatures for each of the named survivors: Nelly, Ann, Silas, Clovis, Baldric, and Sampson with corresponding character cards explaining their powers and statistics.
b. 35 varied zombie “walkers,” which are the most basic of zombie types.
c. 14 varied zombie “fatties,” which represent tougher, more hearty zombies.
d. 14 zombie “runners,” which are agile monsters capable of quickly closing distances between the horde and the survivors.
e. 1 zombie “Abomination,” which serves as one of two bosses. The abomination is a terrifyingly strong, gargantuan creature.
f. 1 Necromancer, which serves as the second of the two bosses, directing and summoning the hordes of zombies.
2. Survivor “Dashboards”
a. The survivor dashboards are plastic trays with slots for tracking progression, equipment, powers, and score. On the top left of the dashboard is the “wound bar” which indicates damage to a player. Below the wound bar is the right hand weapon slot, with the left hand weapon slot being mirrored on the other side of the tray.
In the centre of the board is the location for the player’s hero card, with an added insert for armour and other worn items. Above the left hand equipment slot is the “backpack” where unused possessions are stored, as well as special items like quivers that provide support without actively being equipped. On either side of the hero card slot are small holes for tracking abilities as a character grows in power. Along the bottom of the tray is the “danger bar” which represents the current level of power of the zombie horde.
3. Door Tokens
a. Colour coded tokens that represent different types of doors. Some door types are only accessible when prerequisites have been met.
4. Exit Token
a. This token indicates the “escape” for the survivors in certain scenarios.
5. Noise Tokens
a. Certain actions produce Noise, which attracts zombies. These tokens are placed on the site of the action and will determine where zombies look for prey.
6. Zombie Spawn Tokens
a. These colour coded tokens indicate locations that zombies will enter play from. Included in these are the “necromancer” spawn tokens, which will come into play when Necromancers appear.
7. Equipment Cards
a. In the base box, there are 71 different equipment cards. These provide numerous benefits to the players and range in type from weapons, to armor, to utility items like torches, food, and spells.
b. Equipment cards follow a specific format:
i. In the top area of the card, below the name of the item, will be information about how and when the equipment can be used. On the left side there will either be an empty white icon, or a blue “crossed swords” icon, which determines if an item requires two hands (white) or can be dual wielded (crossed swords). Next to this icon will be a series of colored gems which indicate the danger levels at which a survivor can use the item. On the right side is the “type” of wield for the item. A hand symbol indicates it is held in the hand, whereas an armor symbol indicates it is worn. A backpack symbol indicates that the item can only be held in the backpack.
ii. In the centre of the card will be an image of the item (scrolls are spells). Additionally, some items may display an icon of a door and a bell, which indicates the item can be used to break down a door, at the cost of having to place a Noise token.
iii. At the bottom of the card (if it is a combat card,) there will be a series of icons and numbers. The first icon will be the Noise icon. If it is crossed out, the item is silent and its use does not generate additional noise. Otherwise, its use will generate a noise token in the space it is used. The next value indicates the range of an item in number of “Zones” (explained further in the “Gameplay” section below,) with a 0 being a melee only weapon. After the range value comes a dice icon, the number of which determines how many dice can be rolled on a melee attack with the item. Following the dice value is the accuracy value, indicated by a bullseye icon. The accuracy value determines what number must be rolled or exceeded in order to score a hit. Finally comes the damage value with a skull icon. The number next to the skull will determine how much damage is dealt with each successful hit.
8. Zombie Cards
a. This deck of cards represents variations in the zombies that spawn. When spawning new zombies, cards will be drawn from this deck to determine their individual strength and special abilities.

Setup
Because Black Plague sessions are based on unique scenarios (called Quests), setup will vary from session to session. However, some basic rules will be followed through all session setup phases:
1. Select a Quest from the Quest handbook.
2. Follow the Quest’s unique map tile setup guide.
3. Once the map is constructed, place all Objectives, doors, and miscellaneous scenario specific tokens as indicated in the Quest guide.
4. Choose survivors. Depending on the number of players and the desired difficulty, players may play more than one survivor at a time.
5. Deal out a Dashboard for each character and place that character’s card into the Dashboard. Once dashboards are dealt, deal out colour-coded figurine bases for each character and give all pegs that associate to that colour to the player in control of the character.
6. Set all grey-backed “starting equipment” cards at the side of the play area. Additionally, set any cars with the “vault” keyword aside in a separate area from the starting equipment pile. Vault items are extra-powerful and will sometimes be hidden within the map for players to discover and utilise.
7. Players should decide amongst themselves how to distribute the starting equipment. Every character must have at least one equipment card when play begins. Some characters starting skill will indicate a special item in their possession. The corresponding card should be dealt to the controlling player before play begins.
8. Gather all remaining equipment and zombie cards and shuffle them into respective decks to be placed face down near the board.
9. Set miniatures in the starting “Zone” following the rules in the Quest guide (more on zone definitions below.)
10. Each player should place a peg of the associated colour of each of their heroes in the “0” wound slot on their Dashboard and next to the blue starting skill slot next to their character card. Three extra pegs should be placed in the empty reserve slots at the top of the Dashboard. Additionally, the sliding tracker arrow on the danger bar should be placed at 0.
11. Players should decide who will go first and give that player the “first player token.”
12. Complete any Quest-specific setup steps as indicated in the Quest guide.
Once the first player has been chosen, gameplay can begin.

Gameplay
There are a few core concepts that need explanation before turns, rounds, and combat can be meaningfully explored. Noise, Movement (inside and outside), Zones, Zombie Spawning, and levelling are explained in full below.
Zones and Movement:
When travelling outside, a zone is the area between two linear markings. These are usually approximately squares in shape. Once inside, however, zones are defined by walls. Each separate room is a single zone, meaning some interior zones will be the size of multiple outdoor zones. Line of sight across zones functions by a few key rules. First off, when outside, characters (including zombies) have line of sight that runs parallel to the edges of the board, which is as many zones in length as possible until being interrupted by a wall. When an outside character is looking into a building through an open door, they are able to see only one zone inside, however, a character looking out of a door from inside is able to see in a line until interrupted just as if they were out in the street. Inside a building, vision is based on zone adjacency. Characters are able to see into any zone that shares an opening with the zone they currently occupy, but no further than one zone.
For movement outside, zones must share an open edge for a character to move between them; characters cannot move diagonally. Inside, figurine position is less important and characters can move between any zones that have an opening between them. Walls don’t impede motion as long as there is at least one opening between the zones.
Noise:
All characters are considered to have an intrinsic value of one noise token. This means that characters will always attract the attention of zombies and cannot naturally move completely silently. Some actions with equipment will produce sound as indicated by their card. When an action is taken that generates noise, a noise token must be placed in that zone.
Levelling and Danger Level:
Characters gain experience by slaying zombies. Each slain zombie moves the Danger indicator up one notch on the bar at the bottom of the Dashboard. Each Danger level comes with new skills, but also comes with increased risks. Zombie cards have multiple modifiers based on danger level that will greatly increase the number of threats that appear.
Zombie Spawning and Necromancers:
Zombie Spawn Zones will be placed in accordance with Quest setup from the Quest guide, which determine where new zombies will arrive from. During the Zombies’ turn, each spawn zone will create more enemies. A zombie card should be drawn for each of the spawn zones, in clockwise order. The Danger level determines how the spawn is modified, and is determined by the highest level character in play. Sometimes, when spawning, an “extra activation card” or a “double spawn card” will appear. Instead of causing a spawn, these modify the zombies on the map or the other spawns on the map, respectively. When an extra activation card is drawn, all zombies of the indicated types get an immediate extra activation (activations are explained in the zombie turn section below). When a double spawn is drawn, instead of spawning zombies for the current spawn zone, the following spawn zone will draw two zombie cards instead of one. The cards must be resolved in the order drawn unless another double spawn is drawn, in which case the standard card is resolved first.
In the case that miniatures of any type of zombie run out, resolve an extra activation for all of the zombie type for each spawn that cannot be completed. (The game manual notes that this is especially important for zombies of the Abomination and Necromancer type)
Necromancers also effect spawning. When a necromancer appears, a necromancer spawn token is placed at the zone of entry. When the spawn token is placed, players should draw a zombie card for it and resolve it immediately. It will also, additionally, spawn zombies during the spawn phase as if it were a normal spawn zone.
Once a Necromancer is discovered by the party of characters, it will immediately begin an attempt to flee. Necromancers move one zone towards the nearest spawn zone each turn, ignoring all characters. A necromancer will actually escape the map when it is able to activate a turn on a spawn zone. Killing a necromancer, however, will remove one spawn zone from the map (which does not have to be the one it created.) Note: an escaping necromancer can end the game in a loss, provided there are 6 active zombie and/or necromancer spawn zones.
Now that these core concepts have been explained, turns and rounds can be explored.
Survivor Turns:
During each round, the survivors move first, starting with the survivor player in possession of the first player token. Players activate survivors one at a time, in clockwise order around the table. Survivors are able to initially choose three actions to take each activation, but special abilities may allow for more actions!
The actions a player may take during their turn are as follows:
1. Move
a. This action allows a player to move one zone. Zombies occupying the same zone as a player character cause the move action to increase in cost, by one action point per zombie in the zone. Additionally, entering a zone containing zombies instantly ends a move action, even if bonuses would allow the survivor to move further.
2. Search
a. This action can only be taken when no zombies populate a building zone. Searching allows a player to draw a single card from the equipment deck. They may then choose to keep the card or discard it right away. Cards can be discarded from inventory at any point for no cost. The search action can only be taken once per turn, no matter the circumstance.
3. Open Door
a. This action can be performed if the character is in possession of an item marked with the door symbol. The strike must still hit as usual (by surpassing the weapon’s roll) and the breaking of the door will produce a noise token. There are a small number of weapons that do not require a die roll to open a door, and these will have a door icon with no die icon next to it.
b. Coloured doors cannot be opened until a certain quest parameter is met.
c. When a building is breached for the first time, players should draw a zombie spawn card for each zone, determining how many zombies will be spawned within the building. Buildings open at game start do not spawn new zombies.
d. Vaults can be opened like standard doors, however, they do not provide line of site back out of the vault. Zombies never spawn in vaults.
4. Reorganise or Trade
a. This action allows a player to swap equipment within their own inventory, or trade with another player whose character inhabits the same zone.
5. Combat Actions
a. Melee: A survivor attacks a zombie in their zone following the hit rules described on the weapon.
b. Ranged: A survivor uses a ranged weapon to fire into a zone. All ranged weapons target zones and not the zombies themselves because missing can hit unintended targets, including allies! When attacking ranged, the hit order goes as follows: walker, fatty/abomination (choice of player,) runner, necromancer. Successful hits must be applied to all targets in order of priority. A fatty, for example, cannot be hit if there are still walkers in the target zone. Any misses in zones with an allied character automatically strike that character. Hits on survivors add wounds equal to the weapon’s damage.
c. Magic: A survivor casts an offensive spell on a zone, following the same rules as a ranged attack.
d. Dragon Bile and Torches: Dragon Bile equipment cards can be used to create a pool of bile beneath or next to the character using it. Torch equipment cards can be used to ignite the Dragon Bile, instantly killing all characters or zombies in the zone, regardless of their strength!
6. Take a Vault Artefact
a. If the Quest contains a vault with an artefact in it, attaining the artefact requires a special action expenditure.
Once all players have activated their survivors, the zombies can begin their turn.
Zombies’ Turn:
Zombies each take one action per turn. Either an attack or a move action can be taken. If there is a survivor in the same space as a zombie, that zombie will attack the survivor. Zombie attacks are always successful, but can be mitigated by armour worn by survivors (this mechanic explained in full below.) Zombie turns advance as follows:
1. Activation
a. All zombies are activated and either attack or move. Moving itself follows a few special rules. Zombies will move as long as there are no survivors in their zone. If there are survivors in their zone, all zombies in that zone will attack as a group. If the zombie moves, it will prioritise moving towards zones with survivors in line of sight and the most noise tokens present. If there are no survivors in ling of sight, the zombie will move towards the noisiest zone. Zombies always take the shortest route possible, and are blocked by locked doors.
b. Attacks and Armour:
i. Armour will allow survivors to mitigate damage dealt to them, provided the dice fall in their favour. Each piece of armour displays a number, and for each incoming attack a die should be rolled. Any die roll that exceeds the number on the armour will negate a single wound point.
ii. Shields allows armour rolls if the survivor is unarmored, and additionally allows re-rolls if the survivor is armoured. When performing a re-roll, all dice are rerolled and the new results replace the old results. When taking advantage of these re-rolls, the armour’s numeric value must be used, not the shield’s. A player can elect to pass up on the ability to re-roll in order to use the shield’s numeric value.
2. Spawning
a. As explained above, one zombie card should be drawn for each zombie spawn zone and zombies should be placed according to the card’s description for each Danger level.
Once spawning is complete, the zombie turn ends and the end phase begins. The end phase has only two steps:
1. Remove all noise tokens actively on the board
2. Pass the “first player token” to the player clockwise next to the current first player.
Victory and Loss
Victory conditions vary from Quest to Quest, however, all play-throughs can end in a loss if too many Necromancers escape, or if all survivors die. Additionally, some Quests will have special loss conditions, such as losing a single ally. Because of this, the path to victory will be different every time Black Plague is played.
Other Resources
There is a fantastic ‘how to play’ video which you can find on YouTube and for ease of access I’ve added the video to the page here, you can view it below.